Monday, December 26, 2011

Nondisruptive upgrade of VMFS-3 to VMFS-5

In vSphere 5 the VMFS filesystem has been updated to version 5 (currently 5.54). In vSphere 4.1 update 1 the VMFS version was 3.46.

In earlier versions of ESX, live upgrades of VMFS, or in-place upgrades, haven't been an option so to upgrade VMFS, basically a new LUNs had to be created and then VMs could be migrated to these new LUNs.

With vSphere 5, VMFS can be upgraded nondisruptively. This is done for each LUN by going to:

Datastore and Datastore Clusters -> Configuration -> Upgrade to VMFS-5.

It is a prerequisite that all connected hosts are running vSphere 5. The upgrade itself takes less than a minute (at least in a small test environment).

In VMFS 5, there is only one block size which is 1 MB. However, when upgrading from v3 to v5, the block size remains what it was before (see the last screendump). In the example below, the 8 MB block size is retained.

The new maximum LUN size is 64 TB - but a single .vmdk file can still not exceed 2 TB minus 512 bytes. The only way to have larger .vmdk's than 2 TB is to create an RDM and mount it as a physical device (as opposed to virtual). See this VMware whitepaper for further info.


Wednesday, December 14, 2011

Licensing: vSphere 5 Enterprise and 8 way VMs

In my experience, more and more customers are asking for multiway VMs with more than 4 vCPUs. For my company, an IT service provider, this is a little problematic as most of our licenses are vSphere Enterprise - not Enterprise Plus.

With vSphere 5, 8 way VMs are now possible both in the Standard edition and Enterprise edition. For up to 32 way VMs, the Enterprise Plus license is required.

See link for more info, page 6.

Wednesday, December 7, 2011

VMXNET 3: Supported Guest Operating Systems

VMXNET 3 is the newest NIC driver for VMs (requries VM HW v7). It should be chosen as default for all supported guest operating systems. Windows Server 2000, however, is not supported. Here's link to VMware KB with more info. Remember, that when you delete the old NIC and add a new one, then all IP info is wiped and should be reconfigured (mostly relevant for static IPs).


Saturday, November 26, 2011

P2V with VMware Converter Standalone 5 and sync feature

For this blog post number 100 (uh la laa) I decided to spice things up a bit with video tutorial showing some of the new features in VMware vCenter Converter Standalone 5 including the enhanced synchronize feature (it also existed in v4 but it didn't work too well..).

The video guides you through the migration wizard and discusses some relevant use cases for the sync feature.

Here's a link to Converter Standalone 5

Remember that as of v4.3 Windows Server 2000 is no longer supported as a source OS, so to convert win2k use Converter Standalone v4.01 in stead. In the release notes you can see supported guest operating systems.


Thursday, November 10, 2011

Downloading VMware tools seperately from VMware site

The other day I had to extract the VMware tools ISO for a customer. One way to do it is to log on to a VM that has not updated VMware tools to latest version, choose to upgrade VMware tools manually and then copy all of the files on the mounted ISO and make a new ISO.

However, the different versions of VMware tools can also be downloaded directly from VMware's website on http://packages.vmware.com/tools. There are also tools version for Windows servers.

I found some more info on it on this site


Thursday, October 20, 2011

Got the new book by Scott Lowe - Mastering VMware vSphere 5

At the last day of VMworld in Copenhagen they finally managed to get a number of copies home of Scott Lowe's new book - Mastering VMware vSphere 5 (they said they would have it by Tuesday at first). I got myself one and I'm really looking forward to reading it. One question, though, is how the book will be able to include best practices and operational experiences when the final product has 'just' come out and most of the book must have been written during the beta? But we'll see.


VMworld Europe 2012 announced - Barcelona

Here at VMworld in Copenhagen, VMware has announced the location for next years 2012 VMworld Europe. It will take place in Barcelona from 16-18 October. I have to give cudos to Copehagen and the Bella Center for hosting two extremely well organised VMworlds (2010 and 2011) but I'm also looking forward to a bit warmer climate next October - providing the boss can be persuaded to buy a ticket.

Tuesday, October 11, 2011

How to run XenServer 6.0 on vSphere 5 - with nested Windows Server 2008 R2 VM

It is possible to install XenServer 6.0 in a virtual machine on vSphere ESXi 5 and then with a few tweaks you can even run a nested Windows Server 2008 R2 VM on the virtual XenServer 6.0.

To install XenServer 6.0 in a VM, first follow this guide to configure ESXi 5.0 (or watch this youtube video).

One important step is to execute the following command from the console:

echo 'vhv.allow = "TRUE"' >> /etc/vmware/config

Otherwise, configure like the guide. Once the custom VM has been created, to be able to choose ESXi 5 as operating system, go to Edit Settings -> Options -> Guest Operating System choose 'Other' and then choose VMware ESXi 5.x. This will ensure that you won't receive the "HVM is required for this operation" error when trying to boot the win2k8R2 vm (it is possible to change this after the install of XenServer as well).


Download the install .iso from citrix.com 

Mount iso and install XenServer

When done, you will get startup screen as below


Download XenCenter from citrix.com and install

Add the the XenServer to XenCenter

Create a new VM, choose win2k8 R2 64-bit, mount ISO, install.

Done.


Thursday, September 8, 2011

Upgrading vCenter v4.1 to v5.0

I just upgraded my home lab vCenter server the other day from v4.1 to v5 and took some screen dumps of the installation process. The steps look fairly familiar compared to earlier versions. At one point in the installation I had an error stating that:

"The Fully Qualified Domain Name cannot be resolved. If you continue the installation, some features might not work correctly"

The reason for this error is that I had not created a reverse lookup on the DNS server. By following this guide, the issue was resolved and installation process could continue without further warnings.

Here are the screen dumps:


It was at this step that the DNS error ocurred. Below image shows how a reverse lookup zone was created on the DNS server.


Configuring iSCSI for vSphere 5

Configuring a software iSCSI initiator for ESXi 5.0 is a relatively simple operation. This quick guide assumes that you have already configured an iSCSI target and published it on the network.

For inspiration, have a look at this VMware KB

Create a new vSwitch (Configuration -> Networking -> Add Networking) and add a VMkernel. Configure it with an IP address. 


Go to Storage adapters and click "Add" to add a software iSCSI adapter if it does not exist already.


Once added, right click the software initiator and choose "properties". 


Go to Network Configuration tab and click "Add".


Choose the vSwitch/VMkernel that you created above.


Go ot Dynamic Discovery tab and click "Add" to add an iSCSI target


You will be prompted to input IP address of the iSCSI target, just leave port 3260 as default unless you have configured it differently on your target.


Go to Configuration -> Storage and click "Add storage". Click DISK/LUN and next. If everything has been done correctly, you be able to see your published iSCSI target and can then add and format it with the new VMFS5 file system, uh lala!


Wednesday, August 17, 2011

vSphere 5 official release date

Update: 2011.08.25: vSphere has finally been released (as of 2011.08.24)! It can be downloaded from the VMware site.

Update 2011.08.23: Well, vSphere 5 was not released yesterday as rumors would have it - so I guess we'll just have to wait and see. A guess, not completely unreasonable, would be sometime during this week or on the first day of VMworld in the US...

When: The official release date of vSphere 5 - for GA - has been set to Monday 2011.08.22.

I found info about it here and I got the same info from our license vendor.

Thursday, July 21, 2011

ESXTOP to the rescue - VM latency

Earlier on I have mostly used ESXTOP for basic troubleshooting reasons such as CPU ready and the like. Last weekend we had a major incident which was caused by a power outage which affected a whole server room. After the power was back on we had a number VMs that was showing very poor performance - as in it took about one hour to log in to Windows. It was quite random which VMs it was. The ESX hosts looked fine. After a bit of troubleshooting the only common denominator was that the slow VMs all resided on the same LUN. When I contacted the storage night duty the response was that there was no issue on the storage system.

I was quite sure that the issue was storage related but I needed some more data. The hosts were running v3.5 so troubleshooting towards storage is not easy.

I started ESXTOP to see if I could find some latency numbers. I found this excellent VMware KB article which pointed me in the right direction.

  • For VM latency, start ESXTOP and press 'v' for VM storage related performance counters.
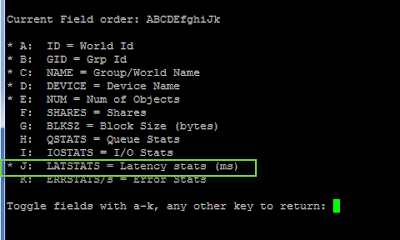
  • The press 'f' to modify counters shown, then press 'h', 'i', and 'j' to toggle relevant counters (see screendump 2) - which in this case is latency stats (remember to stretch the window to see all counters)
  • What I found was that all affected VMs had massive latency towards the storage system for DAVG/cmd (see screendump 1) of about 700 ms (rule of thumb is that max latency should be about 20 ms). Another important counter is KAVG/cmd which is time commands spend in the VMkernel, the ESX host, (see screendump 3). So there was no latency in the ESX host and long latency towards the storage system.

After pressing the storage guys for a while, they had HP come take a look at it, and it turned out that there was a defect fiber port in the storage system. After this was replaced everything worked fine and latency went back to nearly zero.
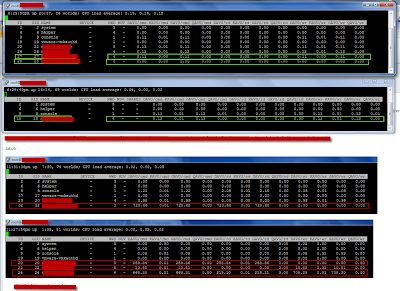
In this case, it was only because I had proper latency data from ESXTOP that I could be almost certain that the issue was storage related.


Screendump 1
Screendump 2
Screendump 3

Sunday, July 17, 2011

Changing IP and VLAN on host - no VM downtime

It is possible to change the service console (COS) IP and VLAN id for hosts in a cluster without having VM downtime (see this post for changing hostname). The trick is to change the COS IP first on all hosts and then wait with the changing of the vMotion IP until all COS IP's have been changed. This way, you will be able to put the hosts into maintenance mode one by one and vMotion will still work with the old IP even though COS IP's will differ in range and VLAN id.

NB. It may be neccesary to disable HA for the cluster before you begin as the HA agent will not be able to configure on the hosts when IP's don't match for all hosts.

  1. Enter maintenance mode
  2. Update the DNS entry on the DNS server
  3. Log on to the vCenter server and flush the DNS: ipconfig /flushdns
  4. Go to ILO, DRAC or something similar for the host (you will loose remote network connection when changing the IP) and change the IP (use this KB article for inspiration): [root@server root]# esxcfg-vswif -i a.b.c.d -n w.x.y.z vswif0 , where a.b.c.d is the IP address and w.x.y.z is the subnet mask.
  5. Change the VLAN id (in this case VLAN 12): esxcfg-vswitch -v 12 -p 'Service Console' vSwitch0
  6. Change gateway: nano /etc/sysconfig/network
  7. Change DNS servers: nano /etc/resolv.conf
  8. Restart network: service network restart
  9. Ensure that gateway can be pinged
  10. Update the NTP server from the vSphere client if needed.
  11. Continue the process with next host in the cluster
When all COS IP's have been changed, go to the vSphere client and change all vMotion IP addresses and VLAN id's. This will not require any downtime. And then test that vMotion works.
Done.


Changing hostname from the service console

The easiest way to change the hostname is via the vSphere client (see this post for changing IP address and VLAN IP). If, however, this is not an option for some reason, the hostname can be changed from the service console the following way:

This KB article actually explains most of the proces which includes:

-----------------

1. Open the /etc/hosts file with a text editor and modify it so that it reflects the correct hostname.

2. To change the default gateway address and the hostname, edit the /etc/sysconfig/network file and change the GATEWAY and HOSTNAME parameters to the proper values.

3. For the changes to take place, reboot the host or restart the network service with the command:

[root@server root]# service network restart
Note: This command breaks any current network connections to the Service Console, but virtual machines continue to have network connection.

------------------------------

I have experienced that after a reboot, the changes are reset and the hostname is changed back to the original one. To avoid this, there is one more step to be performed (before reboot):

Change the /adv/Misc/HostName parameter in /etc/vmware/esx.conf file (see screendump)


Tuesday, June 28, 2011

Error during upgrade: The system call API checksum doesn’t match

Today, I got an error during upgrade from vSphere 4.0 to 4.1 stating something like:

The system call API checksum doesn’t match

There was a lot of similar lines filling the console. I was a bit worried that the upgrade had gone wrong even though I had done three similar upgrades before this one with no errors - and that I would have to reinstall in stead.

Luckily, I found this error description in the 4.1 release notes stating that a reboot will fix the issue. So I waited for a while to be sure that the upgrade finished, rebooted, and everything looks fine:

Link to release notes:

"ESX service console displays error messages when upgrading from ESX 4.0 or ESX 4.1 to ESX 4.1 Update 1
When you upgrade from ESX 4.0 or ESX 4.1 release to ESX 4.1 Update 1, the service console might display error messages similar to the following:
On the ESX 4.0 host: Error during version check: The system call API checksum doesn’t match"
On the ESX 4.1 host: Vmkctl & VMkernel Mismatch,Signature mismatch between Vmkctl & Vmkernel

You can ignore the messages.

Workaround: Reboot the ESX 4.1 Update 1 host. "

Tuesday, June 21, 2011

Used network ports between ESX, vCenter, and the vSphere client

In a single customer setup, the network traffic and ports used in the virtual infrastructure are typically not a focus area because most components can be placed on the same networks. However, in a multiple customer environment we're experiencing that the network guys are asking a lot of questions as they want to lock down and secure the networks (which makes sense..).

Anyway, I just wanted to gather some of the info that I use regularly.

  • A link to my previous post with a network diagram
  • Link to VMware KB article about used ports for a vSphere environment and related components
  • vMotion between networks requires TCP port 8000
  • If searching and sorting VMs in the vSphere client is slow, then ensure that port 8443 TCP is opened between the vSphere client and the ESX hosts
  • If hardware status tab is not available, then ensure that port 8443 TCP is opened between the vSphere client and the vCenter server
  • In vCenter 5.x, if searching and sorting VMs in the vSphere client is slow then port 10443 TCP has to be opened between the vSphere client/client PC and the vCenter server (also, opening this port is required for viewing VM inventory across linked mode vCenter servers - for v5.1)
  • If you can't get a remote console on the VMs (you get a black screen and a yellow bar in the top stating some sort of MKS error) ensure that port 903 (and 902) TCP is allowed from the vSphere client and to the ESX hosts
  • If an ESX host keeps disconnecting in vCenter, ensure that port 902 UDP is allowed from the ESX host to the vCenter
Required ports between ESX and vCenter:

Source
Destination
Direction
Protocol
Port
Purpose
vCenter
ESX
In/out
TCP
902
VMware console
vCenter
ESX
In/out
TCP
903
VMware console
vCenter
ESX
In/out
TCP
443
HTTPS
vCenter
ESX
In/out
TCP
22
SSH
vCenter
ESX
In/out
TCP
80
HTTP
vCenter
ESX
In/out
TCP
161
SNMP
vCenter
ESX
In/out
TCP
5989
CIM
ESX
vCenter
out
UDP
902
Heartbeart


Tuesday, May 10, 2011

vSphere Network Ports Diagram

Here's a great network diagram showing used ports in a vSphere environment made by Dudley Smith. Go here for current version as of 2011.05.10. I had to look for it a bit so thought I'd post the link.


And also, there's the vSphere vReference which is quite handy

Monday, April 18, 2011

Installing View 4.6 in home lab

After recently finishing my home lab ESXi 4.1 installation (the Blue Bad Boy) I thought I'd put it to good use. I decided to do a full View 4.6 installation with external access over PCoIP via a Security Gateway. After getting it all up and running, I must admit that it was a bit more work than initially expected - but it has been a lot of fun.

In this post I will not go into detailed installation steps, in stead I'll try and give an overview of the components that I have used (local mode and linked clones not included) and then link to the posts I've used for inspiration.

Components

First of all, a vCenter installation and a domain controller are required. I have chosen to go with Windows Server 2008 R2 but other than that it is pretty much standard installations.

The main component of the View installation is the Connection Server. And then there is the Security Server which is basically a subset of features from the Connection Server. After installation it is linked to the Connection Server from the Connection Server administrative web interface - and it is also configured from there.

I used this excellent guide by Poul Slager to install the Connection Server. I did the same as Poul and installed just one Win7 VM with the View agent on it and added it to a static pool.

A new feature in View 4.6 is that the PCoIP protocol can now be used also from external sources (e.g. from outside the company network) but this requires a Security Server. The Security Server is typically placed in a DMZ and it is the Security Server which establishes the PCoIP connection directly to virtual desktop.

At the VMware View blog, there's a post with a 40 minute video explaining the infrastructure and new features of View 4.6.

For the specific configurations for enabling PCoIP from external sources, I used the Setting up PCoIP Remote Access with View 4.6 document.

I experienced a strange error when at first I connected to the Security Server from and external source. It worked fine internally but from the outside I could connect and authenticate but then the remote connection just showed a black screen for about 10 seconds and the connection closed. In the View desktop event viewer there was en entry stating: "Closed PCoIP connection doesn't match global value". To fix this I adjusted the configuration in the Connection Server under View Configuration -> Servers and made sure that the external URLs for the Security Server and the Connection Server were identical. The external URL was set for the actual outside URL in both cases and the IP was set for the outside ip of the ADSL modem in both cases - this solved the issue in my case (see screen dumps below).

Currently, with all the components running, the setup is taking up about 10 GB of memory, so there's still room to load up the ESXi box, it has a total of 16 GB, with more VMs! (see screendump below).


Networking

For routing and firewall internally between the infrastructure components I chose a Vyatta virtual appliance which I downloaded from VMware Marketplace. Per default, this appliance included three NICs which suited my requirements for creating an inside LAN, outside LAN, and a DMZ for the security server. On the vSwitch I have created three different VM networks. However, I have not VLAN tagged any of the networks as only one ip range will leave the physical ports on the switch (the Vyatta router acts as gateway for all the infrastructure components).

The learning curve for the Vyatta is quite steep in my opnion. I have spend my fair share of hours trying to figure out the logic of the NAT, DNAT, and the firewal rules. For configuration I have been using a mix between the web gui and the CLI. The CLI is actually quite nice when you get used to it (TAB is your friend).
Remember to save your configurations to disk before rebooting or you will loose all configurations (I learned this a couple of times ;-)). So obviously type 'configure' to into configuration mode and then 'commit' when your done. 'Exit' to exit configuration mode. 'save config.boot' to save configuration to disk. Default credentials for the vyatta is user: vyatta, pw: vyatta.

To get started and setup the Vyatta I used the Quick Start Guide which you can get at vyatta.org. At the site there is also a quick start video which is useful.

And then for firewall configuration etc. I used this guide which worked surprisingly well.

The basic principle for the router in this setup is that you want to allow all traffic from the Inside Lan and the DMZ to be able to get out to the internet. You also want your Inside LAN to be able to access the DMZ. All traffic from the Outside entering the gateway NIC on the router should be dropped. However from all addresses on the Internet, access on port 4172 should be allowed (and directed) only to the security server. And then only the Security server's IP will be allowed to open connections on the same port to the inside LAN. So for 'opening up' a port in the firewall you will need both a firewall rule and a DNAT rule (destination NAT). This last part had me quite confused.

So, the final setup currently configured according to the diagram below. They way I used is to connect to the View Desktop and from there I can open a vSphere client and have full access to the vSphere home lab.


Sunday, April 17, 2011

My ESXi home lab - the Blue Bad Boy

A while back, I decided to build my own home lab whitebox (the Blue Bad Boy) with ESXi 4.1 U1. I've been running Workstation on my laptop with 4 GB memory for some years but the limitations to this setup is obvious. At work we do have a number of test servers that you can play around with but you still have to be a bit more careful than you would in a home setup.

Once the decision was taken, about a million questions followed. I wanted a setup that was similar to our production environment and that could do all the enterprise features such as HA, vMotion, FT, etc. Furthermore, there should be sufficient capacity to run a View 4.6 installation and a vCloud director setup which both require a number of infrastructure components.

So should it be one or two physical servers and what about a NAS box? The full blown setup, it turned out, would be way to expensive for my budget. So I decided to go with one physical box and then with an option to expand with a NAS box later on. For vMotion etc., this could be done with two virtual ESXi's and nested VMs.

There are quite a number of good blog posts and web sites about building home labs. I was leaning towards replicating the BabyDragon setup but two things kept me back. 1) The motherboard was about double the price in Denmark (if you buy from the States they will slaughter you with extra VAT and import taxes) and 2) There's already a number of people who have done this setup so it just seemed a bit too easy.

I ended up leaning towards a setup posted by VMwArune which included a real nice Intel Server Motherboard with dual port GigE ethernet.

Hardware parts

Motherboard
The motherboard is an Intel Server Board S3420GPV which is on the HCL. Form factor is ATX and it sports an integrated dual-port intel NIC (also an the HCL) - so it is not necessary to inject custom drivers or to buy additional Intel NICs (which are relatively expensive). Up to six SATA disks, no SAS. Max 16 GB unbuffered ECC memory. Socket 1156. One internal USB port for ESXi dongle. Unfortunately, it does not have KVM over IP as the Supermicro X8SILF board has.

CPU
For the CPU, I chose the Intel X3440 (on the HCL) which is a 2,53 Ghz quad core processor with hyperthreading. The X3430 was somewhat cheaper but did not have hyperthreading and the X3450 was a bit more expensive but the only difference was the clock frequency (I'm not totally sure it will support FT, though...)

Memory
16 GB (4 x 4) of unbuffered ECC memory, DDR3 (KVR1333D3E9S/4G). The motherboard only supports the more expensive ECC server memory (registered or unbuffered ECC) so that was a bit of a draw back. However, I did run it for a couple of days with regular non-parity non-ECC desktop memory and it worked fine.

Hard drive
I really wanted to get an SSD disk with 128 GB and then a 7200 RPM spindle with more capacity. But the SSD's are quite expensive and as I'm maybe going for NAS later I did not want to spend too much on storage up front. I decided to go with a Samsung F3 1 TB 7200 RPM.

USB dongle
1 x 4 GB regular Kingston DataTraveler for installing ESXi on.

Power supply
From what I understand, these whitebox home labs do not require that much power. So I chose a 430 watt Corsair CX power supply. Not much to say about that.

Chassis
For the chassis I chose a Cooler Master 430 Elite Black. I guess it could be any ATX compatible chassis, but this one was not too big and it is very affordable - and it has a nice glass pane on the side. After I bought it I saw that there's even smaller ATX chassis, the Elite 360, but it only has room for one or two disks.

Ethernet Switch
I wanted a VLAN tag enabled and manageable GigE switch. The HP Procurve 1810G series (8 ports) switch seemed to deliver just that - and again - affordable.

Pimping
Just to spice it up a bit - and because the chassis already holds a blue LED 120 mm fan, I have installed a Revoltec Kold Katode twin set (blue light..).


Inital experiences

I had to go through somewhat of a troubleshooting phase before I had ESXi 4.1 update 1 properly up and running. I was experiencing some very strange errors during install as I couldn't get passed the Welcome screen. If I tried ESX classic (v4.1, v4.0) it would hang in different places while loading drivers. So I updated the BIOS and that didn't help. I tried unplugging USB devices (the CD-ROM is external). Then I found out that the main board only supports ECC memory and I had bought non-ECC memory. So I was pretty sure that the memory was the fault. But - as I returned the memory, I bought a new cheap USB keyboard as I had seen some posts where people had USB keyboard issues. And low and behold - as soon as I changed the keyboard (I was using a Logitech G510 gaming keyboard to begin with), the installation went through clean. And that was even with 4 GB of non-ECC DDR3 memory from my other desktop.

Anyway, the beast is now up and running and everything works like a charm. And it's very quiet. I'd seen posts from ultimo 2010 where people couldn't get the second NIC to work - but it's been working fine for me.


Price

I've ordered all the parts in Denmark but I'll convert prices to Euro so it makes more sense. The total for the whole setup including the HP switch is about 925 EUR (~ 1.332 USD) so it's actually not that bad.

1TB Samsung 7200rpm 32MB SATA2 58 EUR
Intel Server Board S3420GPV - ATX - Intel 3420 160 EUR
INTEL XEON X3440 2530MHz 8MB LGA1156 BOX 208 EUR
Memory 16 GB Kingston unbuffered ECC 253 EUR
Cooler Master Elite 430 Black no/PSU 49 EUR
430W Corsair CX CMPSU-430CXEU 120mm 47 EUR
KINGSTON DataTraveler I 4GB Gen2 Yellow 17 EUR
HP ProCurve 1810G-8 Switch 97 EUR
Twin katode lights 10 EUR
Shipping ~ 27 EUR
Total 925 EUR