Showing posts with label Storage. Show all posts

Thursday, April 2, 2015

Dead paths in ESXi 5.5 on LUN 0

At a client recently, going over the ESXi logs, I found that a certain entry was spamming the /var/log/vmkwarning logs. This was not just on one host but on all hosts. The entry was:

Warning: NMP: nmpPathClaimEnd:1192: Device, seen through path vmhba1:C0:T1:L0 is not registered (no active paths)


As it was on all hosts, the indication was that the error or misconfiguration is not in the ESXi hosts but probably at the storage layer.

In vCenter, two dead paths for LUN 0 were shown on each host under Storage Adapters. However, it didn't seem to affect any LUNs actually in use:


The environment is running Vblock with Cisco UCS hardware and VNX7500 storage. ESXi hosts boots from LUN. UIM is used to deploy both LUNs and hosts. VPLEX is used for active-active between sites (Metro cluster)

The ESXi boot LUN has id 0 and is provisioned directly via VNX. The LUNs for virtual machines are provisioned via the VPLEX and their id's starts from 1.

However, ESXi still expects a LUN with id 0 from the VPLEX. If not, the above error will show.

Fix

To fix the issue, present a small "dummy" LUN to all the hosts via the VPLEX with LUN id 0. It can be a thin provisioned 100 MB LUN. Rescan the hosts. But don't add the datastore to the hosts, just leave it presented to the hosts but not visible/usable in vCenter. This will make the error go away.

When storage later has to be added, the dummy LUN will show as an available 100 MB LUN and likely operations guys will know not to add this particular LUN.

From a storage perspective the steps are the following:


  • Manually create a small thin lun on the VNX array 
  • Present to VPLEX SG on the VNX
  • Claim  the device on VPLEX
  • Create virtual volume
  • Present to Storage-views with LUN ID 0
  • Note.  Don’t create datastore on the lun.
Update 2015.07.21; 
According to VCE, adding this LUN 0 is not supported with UIM(P (provisioning tool for Vblock). We started seeing issues with the re-adapt function for UIM/P and storage issues after that. So we had to remove the LUN 0. So far, there is no fix if using UIM/P.

Thursday, March 26, 2015

Moving EMC VPLEX Witness server to the cloud - vCloud Air

To have a full active-active storage setup with live fail-over in case of a site failure for EMC VPLEX (with e.g. VNX or VMAX below), a Witness server is required. This is a small OVF Linux appliance (based on SLES). The witness server must be placed in a third failure domain, ie a third physical site.

If this is not done, then manual intervention is required to activate remaining site. This is described here (EMC documentation) and here (VMware documentation).

I have seen at multiple clients that a third site is not available and then the Witness server is placed on one of the two sites.

I looked into whether the Witness server can be moved to a cloud provider. Apparently it cannot be moved to Amazon AWS due to a specific kernel parameter set in the appliance (SLES) that doesn't match with the underlying AWS hypervisor, which is based on XenServer (this is what I've been told).

My thought was that the new VMware vCloud Air IaaS solution could be used as it is based on VMware ESXi and the Witness server normally runs on an ESXi host. Contacting EMC both in Denmark and in Sweden did not give a result. They didn't know whether this could be done and the official VPLEX documentation doesn't specify anything in this regard (link above).

However, after a bit of digging I found an EMC whitepaper that describes this exact situation (it is from 2015 and probably quite new)

It is technically possible and supported by EMC. The white paper includes documentation, installation steps, and security details. EMC professional services can assist with install/config if required.

Update 2015.07.22: We have now implemented this successfully in production and it was a fairly painless process.

Link to white paper


It should be ensured that proper monitoring is set up for the Witness server. Connection state can be verified manually in the VPLEX Unisphere interface (see below). Also VPLEX can be configured to send SNMP traps to a monitoring tool for alerting.


Sunday, December 22, 2013

VMFS heap depletion

Over the past couple of days, we've had a VM that has crashed a number of times. When you try to open the VM console you get a black screen and a yellow MKS error at the top of the console. Strangely enough the VM can still be pinged. After powering it off and on again it boots but after not too long the same thing happens again. Also, vMotion did not work for a number of VMs and fails with the following error:

"The operation is not allowed in the current state"

In the vmkwarning log there are the following entries:

"WARNING: HBX: 1889: Failed to initialize VMFS3 distributed locking on volume 50d136be-62d92875-869a-10604bace2cc: Out of memory"

"WARNING: Fil3: 2034: Failed to reserve volume f530 28 1 50d136be 62d92875 6010869a cce2ac4b 0 0 0 0 0 0 0"

"WARNING: Heap: 2525: Heap vmfs3 already at its maximum size. Cannot expand."

"WARNING: Heap: 2900: Heap_Align(vmfs3, 6160/6160 bytes, 8 align) failed.  caller: 0x41800d8e84e9"

I found a KB article and a post from Cormac Hogan that explains the issue.

In ESXi 5.0 U1 the default VMFS heap size is set to 80 which means that the maximum total size of open vmdk files is 8 TB. When that limit is reached, then VMs can't access their disks.

There are two ways to fix this:

  • Upgrade to ESXi 5.1 U1 (or ESX 5.0 patch 5)
  • Increase the VMFS3.MaxHeapSizeMB to 256 (default is 80) in Configuration -> Advanced Settings and reboot the host

Upgrading to ESXi 5.1 U1 increases the maximum file total size of open vmdk's to 60 TB in stead of 8 TB.

Increasing the heap size to 256 will increase the maximum to 25 TB.


Thursday, March 14, 2013

vMotion error at 63% due to CBT file lock

A number of times in the past couple of years, we've had issues with vMotion on ESX 4.1 which happened after storage/SAN breakdowns/issues. ESX doesn't handle losing its storage very well and this can create locks on the VMs that can only be fix by rebooting the host (and shutting the hung VMs down first).

However, the other day I experienced the same sort of error on a ESXi 5.0 cluster which had not had any storage issues. This is quite inconvenient when you can't put a host into maintenance mode.

When initiating a vMotion, the VM fails at 63% with the following error:

"The VM failed to resume on the destination during early power on. 
Reason: Could not open/create change tracking file.
Cannot open the disk '/vmfs/volumes/xxxxxx/vmname.vmdk' or one of the snapshot disks it depends on"

It should be mentioned that for this customer we use Symantec Netbackup 7.5 with agentless .vmdk backup. To speed up the backup process we have enabled Changed Block Tracking (CBT) on the VMs.

I found this KB article but it only related to ESX 4.0 and 4.1 and also the suggestion is to just disable CBT which is not an option.

After a talk with VMware Support, we found the error.

It turns out that there is a lock on one or more of the .ctk files which are the files that keep track of changes to the .vmdks. These ctk files are created automatically when CBT is enabled. If one or more of these files are deleted, they will be recreated automatically.
In a normal setup, the .ctk files will only be locked for a few seconds when the backup software accesses the file.

The error looks like this:


To fix it, do the following:

Putty to one of the ESX hosts (remember to enable SSH under security profiles first).
Cd to the directory of the .vmx file

List all the .ctk files:

#ls -al | grep ctk

For each ctk file, verify whether the file has a lock

#vmkfstools -D vmname-ctk.vmdk

look for "mode" in the output. If it is "mode 0" your fine. If "mode 1" there's a lock. For "mode 2" something is completely wrong...


If you find a lock on a file, create a tmp directory and move the ctk file there (do this for all ctk's with locks):

#mkdir tmp

#mv vmname-ctk tmp

This will also work when the VM is powered on.

And you're done. After this, the VM will vMotion without failing.

This has been tested and works both on a ESX 4.1 classic cluster (where I had the same issue) and ESXi 5.

The VMware engineer could not give me an exact root cause but he was fairly sure that it was related to the backup software and that something had gone wrong while this software has been accessing these files.

Friday, April 27, 2012

View HBA firmware version from service console

To view HBA firmware version from service console (ESX classic) go to /proc/scsi/qla or lpfc820.
Here you will typically find to text files, e.g. '2' and '3'. Run a 'cat' or 'more' on the files (see screendump below). See this post for more info


For ESXi v5.x, see this link.

Monday, December 26, 2011

Nondisruptive upgrade of VMFS-3 to VMFS-5

In vSphere 5 the VMFS filesystem has been updated to version 5 (currently 5.54). In vSphere 4.1 update 1 the VMFS version was 3.46.

In earlier versions of ESX, live upgrades of VMFS, or in-place upgrades, haven't been an option so to upgrade VMFS, basically a new LUNs had to be created and then VMs could be migrated to these new LUNs.

With vSphere 5, VMFS can be upgraded nondisruptively. This is done for each LUN by going to:

Datastore and Datastore Clusters -> Configuration -> Upgrade to VMFS-5.

It is a prerequisite that all connected hosts are running vSphere 5. The upgrade itself takes less than a minute (at least in a small test environment).

In VMFS 5, there is only one block size which is 1 MB. However, when upgrading from v3 to v5, the block size remains what it was before (see the last screendump). In the example below, the 8 MB block size is retained.

The new maximum LUN size is 64 TB - but a single .vmdk file can still not exceed 2 TB minus 512 bytes. The only way to have larger .vmdk's than 2 TB is to create an RDM and mount it as a physical device (as opposed to virtual). See this VMware whitepaper for further info.


Thursday, September 8, 2011

Configuring iSCSI for vSphere 5

Configuring a software iSCSI initiator for ESXi 5.0 is a relatively simple operation. This quick guide assumes that you have already configured an iSCSI target and published it on the network.

For inspiration, have a look at this VMware KB

Create a new vSwitch (Configuration -> Networking -> Add Networking) and add a VMkernel. Configure it with an IP address. 


Go to Storage adapters and click "Add" to add a software iSCSI adapter if it does not exist already.


Once added, right click the software initiator and choose "properties". 


Go to Network Configuration tab and click "Add".


Choose the vSwitch/VMkernel that you created above.


Go ot Dynamic Discovery tab and click "Add" to add an iSCSI target


You will be prompted to input IP address of the iSCSI target, just leave port 3260 as default unless you have configured it differently on your target.


Go to Configuration -> Storage and click "Add storage". Click DISK/LUN and next. If everything has been done correctly, you be able to see your published iSCSI target and can then add and format it with the new VMFS5 file system, uh lala!


Thursday, July 21, 2011

ESXTOP to the rescue - VM latency

Earlier on I have mostly used ESXTOP for basic troubleshooting reasons such as CPU ready and the like. Last weekend we had a major incident which was caused by a power outage which affected a whole server room. After the power was back on we had a number VMs that was showing very poor performance - as in it took about one hour to log in to Windows. It was quite random which VMs it was. The ESX hosts looked fine. After a bit of troubleshooting the only common denominator was that the slow VMs all resided on the same LUN. When I contacted the storage night duty the response was that there was no issue on the storage system.

I was quite sure that the issue was storage related but I needed some more data. The hosts were running v3.5 so troubleshooting towards storage is not easy.

I started ESXTOP to see if I could find some latency numbers. I found this excellent VMware KB article which pointed me in the right direction.

  • For VM latency, start ESXTOP and press 'v' for VM storage related performance counters.
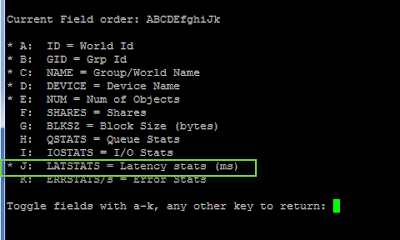
  • The press 'f' to modify counters shown, then press 'h', 'i', and 'j' to toggle relevant counters (see screendump 2) - which in this case is latency stats (remember to stretch the window to see all counters)
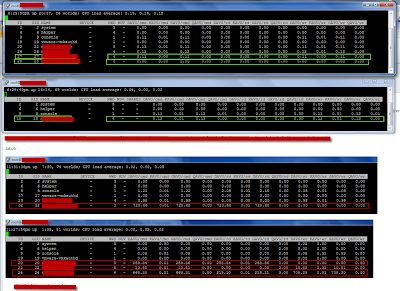
  • What I found was that all affected VMs had massive latency towards the storage system for DAVG/cmd (see screendump 1) of about 700 ms (rule of thumb is that max latency should be about 20 ms). Another important counter is KAVG/cmd which is time commands spend in the VMkernel, the ESX host, (see screendump 3). So there was no latency in the ESX host and long latency towards the storage system.

After pressing the storage guys for a while, they had HP come take a look at it, and it turned out that there was a defect fiber port in the storage system. After this was replaced everything worked fine and latency went back to nearly zero.

In this case, it was only because I had proper latency data from ESXTOP that I could be almost certain that the issue was storage related.


Screendump 1
Screendump 2
Screendump 3

Thursday, July 8, 2010

Disaster recovery: Procedure in case of site failure


Here's a short example of a procedure for recovering a VMware cluster from a site failure. The example scenario consists of two ESX4 hosts on replicated storage divided on seperate locations. There's no automatic failover for storage between sites, manual breaking of the mirror is required.

1.

Log into vCenter and verify whether or not storage is available for the cluster. If storage is unavailable, create an incident ticket for the storage group with priority urgent and with a request to:

“Manually break the mirror for the “"Customer X" replicated storage group” used by ESXA and ESXB”

The ticket should be followed by a phone call to the storage day/night duty to notify of the situation.

2.

When mirror has been broken, rescan remaining hosts in the cluster. This rescan can possibly time out. If this happens, reboot the hosts.

After the rescan/reboot all shared LUNs will be missing on the hosts. These should be added/mounted manually from the console (step 3) (in ESX4u1 there's a bug in the add "storage" wizzard, so it doesn't work from the vSphere client, see this post for more info)

3.

Putty to each of the hosts and run the following commands:

#esxcfg-volume –l

This will list available volumes. For each volume, run the following command:

#esxcfg-volume –M label or UUID>

For example:

#esxcfg-volume –M PSAM_REPL_001

See screendump below for further exemplification:


4.

From the vSphere client, for each of the available hosts go to Configuration -> Storage and click “Refresh”. Verify that all LUNs appear as before the site failure

5.

Power on all VMs

6.

Done. In this situation, storage will run from the secondary site. The storage group will be able to reverse the replication seamlessly at a later stage when failed site is operational again. This does not require involvement from the VMware group.

Thursday, October 8, 2009

Howto: Check if SAN cables are connected in ESX

When installing an ESX host and you have someone other than yourself taking care of the cabling of the host, it is very handy to be able to check wheather this has been done properly. You want to be able to verify that the HBA's have been physically connected to the fabric switches with fibre cables.

Ssh to the ESX host
ls to the /proc/scsi/qla2300 folder (if it's a Qlogic HBA...)
In this folder there are a number of text files named with the numbers 1-x corresponding to the number of HBA ports in your ESX.
Cat the files one at a time:

#cat 1
or
#cat /proc/scsi/qla2300/1

look for the following line in the files:

Host adapter:loop state=READY, flags= 0x8430403

If it says READY, the HBA has been physically connected to the fibre switch. If it says DEAD, then it is not.

Friday, April 10, 2009

Configuration of iSCSI in VMware VI3

Introduction

The purpose of this post is to describe how to configure an iSCSI SAN in a VMware virtual infrastructure 3.5 with software initiator.

The prerequisites for this instruction are that the network and storage system has been configured and that you have received the following information:

ESX Hosts

  • ILO IP and credentials
  • IP address for ESX host
  • IP address for VMotion
  • FQDN for the ESX host (should be able to resolve)
  • Is ethernet traffic VLAN tagged (then you need VLAN ID) or is it only access ports?
  • Subnet, gateway, DNS servers
Storage (typically set up in closed network, 192.168.1.x/24)
  • IP addresses for the storage targets (typically 2 or 4 targets)
  • IP address for the Service Console on ESX
  • IP address for VMkernel (iSCSI) on ESX
  • Subnet and gateway
  • Make sure a LUN is made available by storage group
Read the “iSCSI Design Considerations and Deployment Guide” from VMware for detailed instructions. Just search on Google for it.

Furthermore, ensure that you have two separate NICs in the ESX host that can be used for storage. So, if it’s a Blade, then 4 NIC’s for Ethernet traffic and the two last on mezzanine card 2 for storage. The NICs can be of any type and make since the iSCSI initiator is software based and controlled by ESX on top of the NIC.

Instruction steps

0. First, below is a typical storage architecture:

1. In VI client: Make sure the ESX server is licensed for iSCSI and VMotion under Configuration -> Licensed features

2. Under Configuration -> Networking add a new virtual switch that will be used for storage. Attach the NIC’s you want to use.

3. Click properties for the new vswitch and add a Service Console 2 (COS2). Give it an ip address and subnet (typically local ip.). This second service console will receive the gateway of the first Service Console (a routable gateway ip). This is fine as it is not to be used in COS2.

4. Click properties for the new vswitch and add a VMkernel which will be used for iSCSI traffic. Label it iSCSI. Type in ip address and subnet.
After VMkernel is created enter properties for it and enter VMkernel Default gateway. This gateway ip should be the same as the IP address of COS2. So VMkernel points its gateway to the local service console.
Do not tick the box for VMotion use.


5. When done, the network configuration could like dump below:


6. Make sure the vmkernel has a gateway under “DNS and routing”


7. Go to security profile and enable software iSCSI client through the firewall:

8. Go to configuration -> storage adapters and click on the vmhba and click “properties”


9. Click Configure and then tick the “Enabled” check box and click OK.


10. On the Properties page for the software iscsi adapter, choose the Dynamic Discovery tab and enter the ip addresses of the storage targets (static targets are not supported for software initiators.)


11. Now, from the storage adapters page, rescan the HBA’s and verify that you see 2 or 4 targets (storage targets)


12. From Configuration -> Storage add the new LUN or LUN’s

13. When you have added a LUN, right click it and choose properties

For a MSA2012i with two Storage Processors (SP’s) with each to ports, there will be 4 targets (Update: In 3.5 U3 I've seen same setup but only two visible targets - but live SP fail-over works fine still). There will be 2 paths (typically on Fiber HBA’s, there are 4 because each HBA is represented with each two paths). With software initiator, there is one logical initiator and then two physical NICs teamed in the vSwitch. The initiator has two paths to two targets on the same SP.
14. Tricks:
  • Make sure that all targets can be pinged from COS2. SSH to the ESX host. From the console, SSH to COS2. From there you can ping the targets
  • If it’s a HP Blade 3000/7000 enclosure, make sure connections between the two switches used for storage are allowed (done by network department)
  • Jumbo Frames: If you are to enable it, remember to change it on all relevant parts: Storage, Network, ESX (on Switch and Port groups). Jumbo frames are not necessarily supported by the physical NIC’s. on the BL460cG1, the built-in NIC’s are supported but the HP NC326m, for example, is not. To enable jumbo frames from console, type following two commands:
    VMkernel command: esxcfg-vmknic -a -i 'ip-address vmkernel' -n 'netmask vmkernel' -m 9000 'portgroupname'
    vSwitch command: esxcfg-vswitch -m 9000 'vSwitchX'
  • Check outgoing ESX traffic: From the console, you can, when you rescan for new HBA’ and VMFS volumes, check if there is any traffic from the ESX to the targets (run command simultaneously with rescan)
  • Netstat –an grep 3260
Example:
[root@vmtris001 root]# netstat -an grep 3260
tcp 0 1 192.168.1.12:33787 192.168.1.2:3260 SYN_SENT
tcp 0 0 192.168.1.12:33782 192.168.1.4:3260 TIME_WAIT
tcp 0 1 192.168.1.12:33788 192.168.1.3:3260 SYN_SENT
tcp 0 0 192.168.1.12:33779 192.168.1.1:3260 TIME_WAIT